Getting started
Field Suite has two sides: the office, where jobs are booked and followed on a computer, and the engineer’s phone, where each job is done and signed off. One account covers both.
- Create your account. Go to Start free trial, enter your business name, your name, your work email and a password. You are the owner of the account.
- Confirm your email. Open the email we send and press the button. The link works for 60 minutes.
- Fill in your business details. In the menu, open Business. Add your phone, email and address: they appear at the top of every job sheet. You can also choose the letters at the start of your job numbers, for example
ACP-1001. - Invite your team. Open Team and invite your office staff and engineers (see the next section).
- Add your first customer and job. Open Customers, add a customer with the address where the work happens, then press New job at the top of any page.
Your free trial lasts 14 days, with every feature and up to 10 users. You do not need a card to start.
Your team and how people sign in
Everyone signs in at the same web address with their own email and password. What they see depends on their role:
| Role | What they can do |
|---|---|
| Owner | Everything, including the licence and card payments. Can hand ownership to someone else. |
| Admin | Everything except payments: the team, business details, diary, jobs and customers. |
| Office | Books and moves jobs, keeps customers, sites and equipment up to date, sees reports. |
| Engineer | Sees only their own jobs, on their phone or any computer. Cannot see other engineers’ jobs or the customer list. |
Inviting someone
- Open Team and type their email under Invite someone.
- Choose their role: Engineer, Office or Admin, and press Send invitation.
- They receive an email with a button. The link works once, for 7 days.
- They choose their own password and they are in. Their email is already confirmed by the invitation.
Each person uses one licence: an engineer takes an engineer licence (or a free office one), everyone else an office licence. If all your licences are in use, add more on the Licence page or remove someone first. To change a role or remove someone, use the list on the Team page. Jobs of a removed engineer stay on record.
Who changed what
Owners and admins open Team → Changes log. It lists every change to jobs, customers, sites, equipment, certificates, contracts, job types and qualifications: who made it, when, and each value before and after. A second tab lists settings, sign-ins and payments. Equipment and sites you remove are kept out of sight, so old jobs and certificates still show them.
For engineers: your phone
There is nothing to download. Engineers use Field Suite in the phone’s web browser, on iPhone or Android.
- Open the invitation email on your phone and press Join the team. Choose a password.
- Put Field Suite on your home screen so it opens like an app:
- iPhone (Safari): tap the Share button, then Add to Home Screen.
- Android (Chrome): tap the three dots, then Add to Home screen.
- Tick “Keep me signed in on this device” when you sign in, so you do not have to type your password every day.
- Open “Today”. You see your next job at the top, with Open the job and Directions, then the rest of your day and what is coming up.
You are told when the office books a job for you, moves it or cancels it: look for the red number on the bell at the top.
Working without signal
Plant rooms, basements and lift shafts often have no signal. Field Suite keeps working as far as it safely can:
- Pages you opened earlier still show: your day, the job, the customer’s details. Open the day’s jobs while you have signal and they are there when you need them.
- Certificates and forms are kept on the phone as you fill them in (“Kept on this phone”) and sent by themselves when the signal returns.
- A bar at the top says No signal. Other changes, such as the job status, photos and the signature, need signal to save: do them when you are back in range.
- When you sign out, everything kept on the phone is deleted. If some form answers have not been sent yet, you are asked first.
Customers and sites
A customer is who you work for. A site is a place where the work happens: a customer can have many, for example a head office and three branches.
- Open Customers and press Add a customer. Add their name, a contact, a phone and the email that should receive job sheets. Add the first site’s address and postcode in the same step.
- On the customer’s page, press Add a site for more addresses. Use Access notes for key safes, parking or opening times: engineers see them on the job.
- Customers you no longer work for can be archived. Their jobs stay on record and you can restore them any time.
The search box at the top of every page finds customers and jobs by name, job number or postcode. Press ⌘K or Ctrl K to jump to it.
Main contractors
Some customers need their order (PO) number on every invoice, or hold back retention. Tick Needs an order number and set the retention percentage and how many days it is held on the customer’s details: invoices then refuse to go without the number, and the retention is worked out and shown on each invoice.
Adding and booking jobs
- Press New job at the top of any page. Type part of the customer’s name or a site postcode and pick them. Choose the site and, if the job is about one item, the equipment.
- Say in a few words what the job is, choose the type (service, repair, installation, inspection or emergency call-out) and the priority. Add notes for the engineer: the fault reported, parts to bring.
- To book it now, choose the engineer, the date, the start time and how long to allow. To book it later, leave those empty: the job waits in the diary’s To book list.
Job types and the client’s request
- Job types: on Forms → Job types, set up the jobs you book most, like “Boiler breakdown” or “Annual pump service”: usual length, priority, the form that goes on the job, the qualification the engineer needs and how soon you must attend and fix. Pick one at the top of a new job and it fills those in. If the engineer you book lacks the qualification, you are told.
- The client’s request: under Client’s request details keep their own reference (the ticket or work order number), who reported it, the contact on site, the attend-by and fix-by deadlines and the spending limit agreed. The job page counts down to each deadline and shows when one is missed.
- Office notes: only the office sees them, never the engineer or the customer.
- Files: add the client’s work order, drawings or permits to the job (PDF, pictures, Word, Excel or email files, up to 20 MB). Tick Office only to keep a file off the engineer’s phone.
- On hold: on a job not started yet, choose why it is waiting (parts, no access, a quote first, a return visit). It leaves the diary and shows the reason in To book until you book it again.
The diary
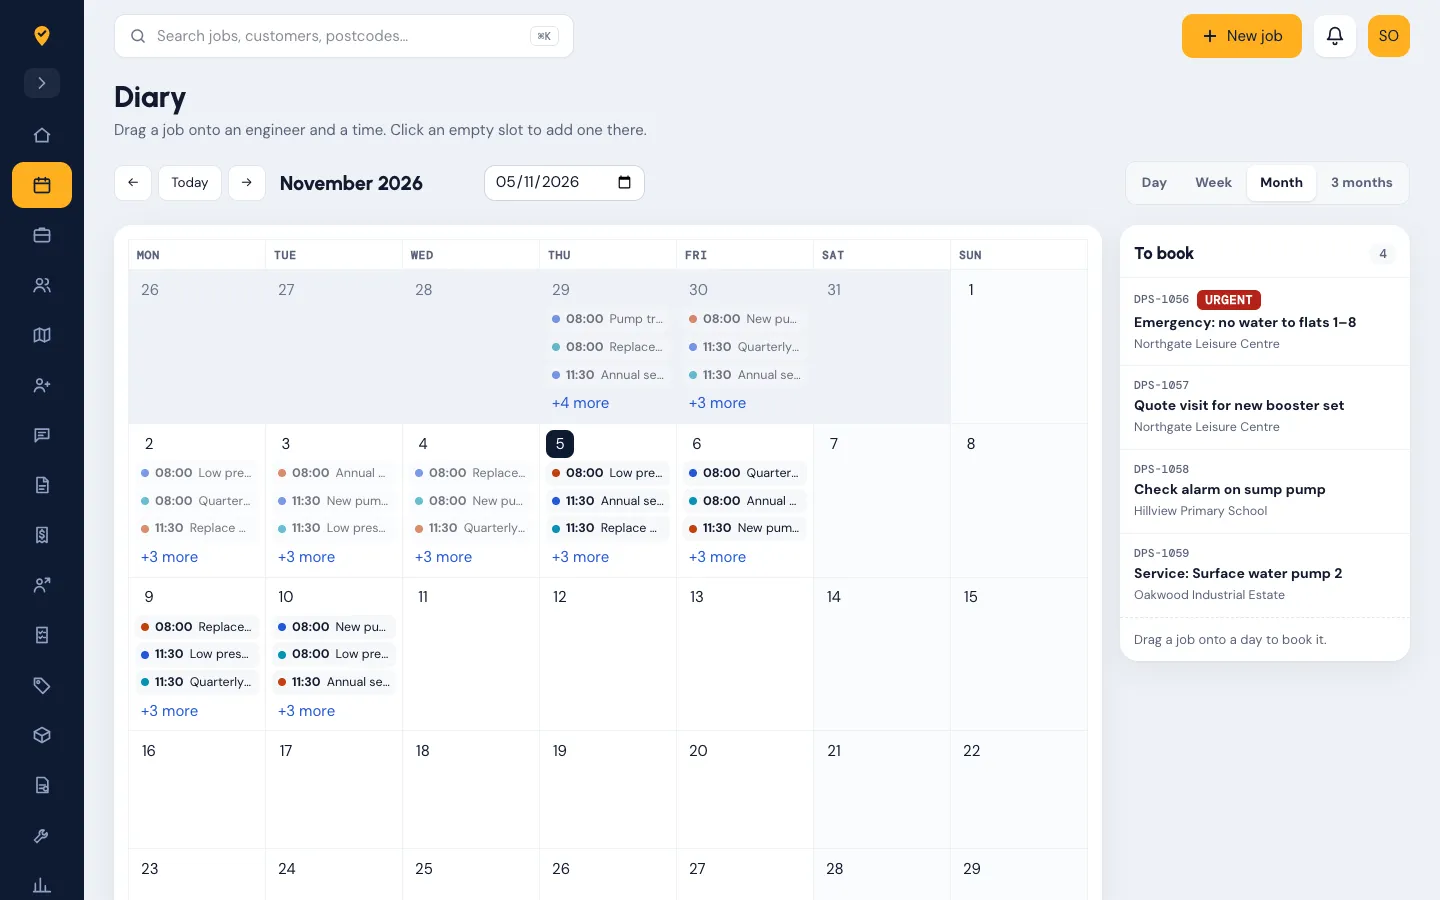
- Day view: one column per engineer, from 07:00 to 19:00. Week view: one column per day, for everyone or for one engineer. Month and 3 months: a calendar with the appointments of each day; drag a waiting job onto a day to book it.
- Book a waiting job: drag it from To book onto an engineer and a time.
- Move a job: drag it to another time or another engineer. The engineer is told straight away.
- Take a job off the diary: drag it back onto the To book list.
- Add a job at a time: click an empty space in a column.
- Jobs already started or finished cannot be moved. On a phone, the diary shows a list for each engineer.
- Best order: in the day view, press Best order above an engineer. Field Suite puts their visits in the shortest driving order, shows the miles before and after, and Use this order moves the times for you.
The live map
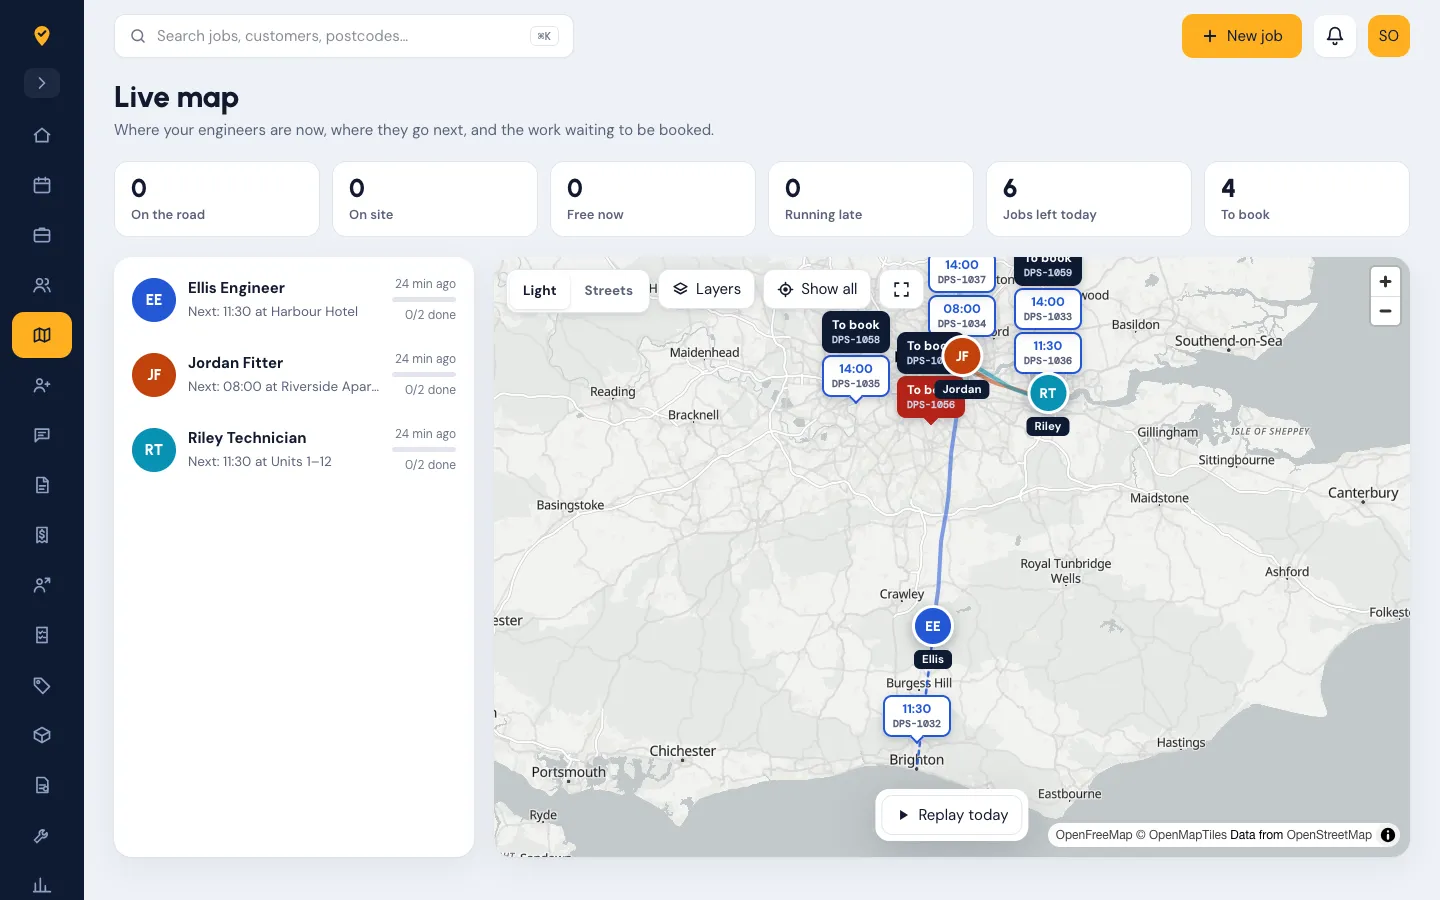
Open Live map. Each engineer is shown where their phone last was, with their next job and how much of the day is done. The numbers at the top count who is on the road, on site, free now and running late.
- Jobs still to book are on the map too: pick one to see which engineers are nearest.
- Replay today plays back the route each engineer drove.
- Positions are recorded only during the working hours set in Business, and only while the engineer has Field Suite open. They are deleted after 30 days.
- Where you record hours (People), a position is taken only between the engineer's Start my day and End my day. Never on a day of approved holiday or sickness.
- Engineers can pause it from the green Location shared button at the top of their phone, until they turn it back on or the end of the day. The pause is noted in the business's log.
Before you switch it on
The law expects you to tell your engineers, in writing, why you track them, when, who sees it and for how long (UK GDPR Articles 5 and 13), and the ICO says employers should carry out a data protection impact assessment before monitoring workers (and must, where the monitoring is high risk). A short assessment covers:
- Why: for example sending the nearest engineer to a call-out, safety of lone workers, and proof of attendance for customers.
- Is it needed: only working hours, only the business's hours set in Field Suite, never on leave, a pause button, no driving scores.
- Who sees it: owners, admins and office users of your business only.
- How long: positions are deleted after 30 days.
- Risks and what you do about them: for example engineers feeling watched, so tell them first, review it yearly and listen to complaints.
See the ICO's guidance on monitoring workers (checked 5 November 2026).
Doing the job, step by step
This is what the engineer does on the phone. The office sees each step as it happens.
- On my way. Open the job and tap On my way. Use Directions to open Google Maps. If you are already there, tap Already on site.
- I have arrived. Tap it when you get there. The time is recorded: it is how “on time” and “time on site” are measured.
- Parts and materials. Type what you used and the quantity, and tap Add. They appear on the job sheet.
- Photos. Tap Take or add photos to use the camera or pick photos. They are made smaller automatically so they upload quickly.
- Notes. Anything the office should know: what you found, what is still needed.
- Finish and get it signed. Write what was done (it goes on the job sheet). Type the customer’s name and ask them to sign with a finger in the box. If nobody can sign, tap The customer cannot sign and say why.
- Tap Complete. The job is closed and the office is told.
A completed job cannot be changed from the phone. If something needs correcting, the office can Reopen it.
More than one visit, more than one engineer
- Can’t finish today: on site, tap it and choose why: waiting for parts, a return visit, no access, or a quote needed first, and say what is needed next. The visit is kept on the job, the office is told, and the job goes back on the list to book with the reason shown.
- Two or more engineers: in the office, open the job and use Add engineers to this job. They see it on their phone and in their diary column, and their time is counted in the job’s costs.
- Every visit is listed on the job, with who went and how it ended.
Certificates and forms
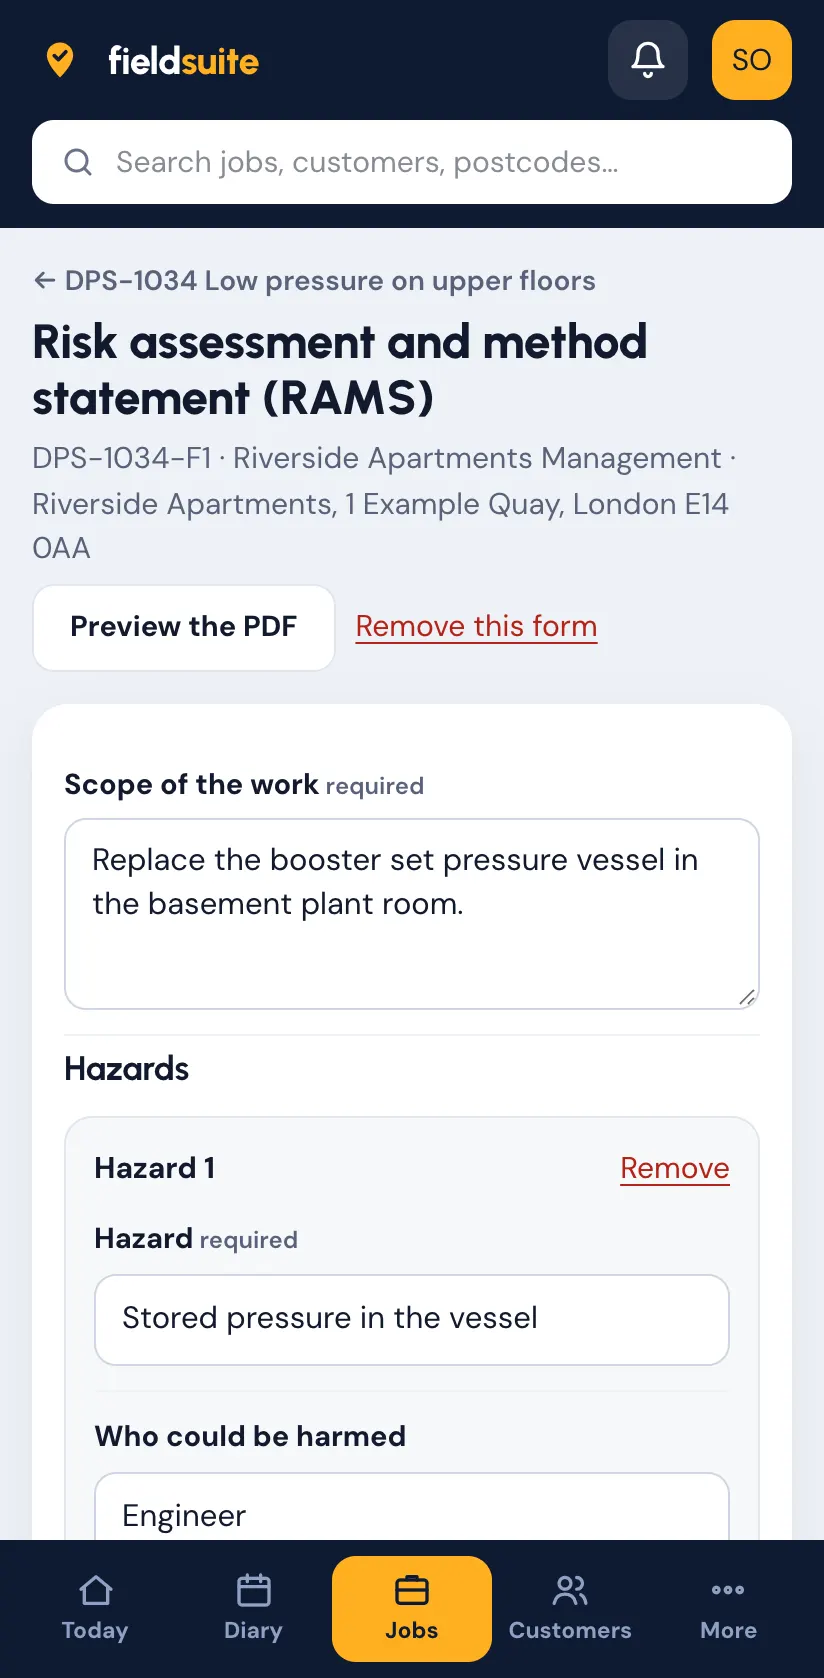
Open Forms. Under Ready-made UK forms you find a landlord gas safety record, an EICR, a fire alarm inspection (BS 5839-1), an emergency lighting test (BS 5266-1), an F-gas leak check, a risk assessment and method statement (RAMS) and a pump service checklist. Press Add on the ones you use and change any question to suit your work, or build your own under Your forms.
- Build a form: give it a name, then add questions: text, numbers with a unit, pass or fail, yes or no, choices, dates, and repeating rows (one row per appliance or per circuit). Mark the answers that fail the form, and say after how many months the next one is due.
- Add it to a job: on the job, under Forms and certificates, pick the form. The engineer can add one on site too.
- Fill it in: answers are saved as you go. A failed answer is shown in red and the engineer is reminded to tell the customer. Fixed details start filled in: the engineer's name and licence card number from their last form, your registration numbers, and the site's and the equipment's details (landlord, appliances and their make and model, circuits, pump) from the last form of the same kind there. Readings, measurements and results always start empty.
- Sign off: the engineer signs, the customer signs, and the form becomes a PDF with your logo. Preview the PDF shows it before then. Each engineer draws their own signature once, under Settings → Profile, and it goes on every form they sign off.
- Signed off means locked: a signed-off certificate is never changed. To correct one, the office presses Correct it (new revision) and says why. The copy is numbered R1, R2 and so on, and replaces the original only when it is signed off. The original stays, marked Superseded, and its PDF says so. Readings, results and dates should only change after a new check on site.
- Only qualified people sign off: a form can ask for a qualification, like Gas Safe on the gas safety record and F-gas on the F-gas leak check. Whoever signs it off must have it, in date, in their People record. The owner can sign off anyway with a reason, which is kept on the form and in the business's log.
- Record check: each signed-off PDF carries a short code made from everything on it. If a printed copy has been altered, the code no longer matches the one in Field Suite.
The Forms page lists what is Coming due in the next 60 days, so you can book the next inspection in time.
Faults found on the visit
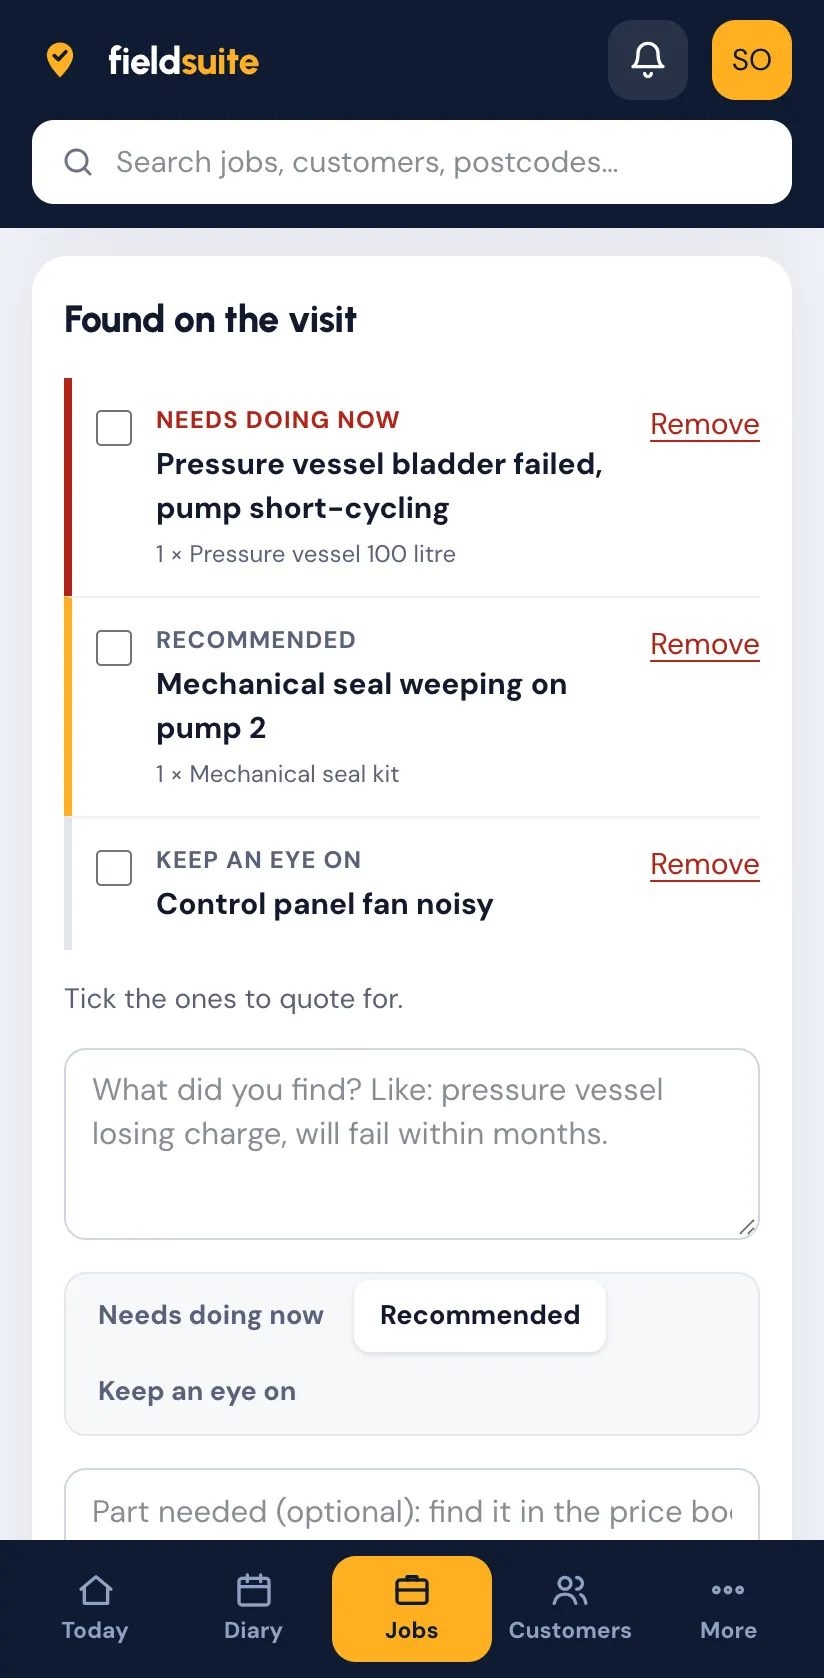
On the job, under Found on the visit, the engineer writes what they found, chooses how soon it needs doing (Needs doing now, Recommended or Keep an eye on) and, if they know it, the part from the price book.
- What was found is printed on the job sheet, so the customer sees it in writing.
- In the office, tick the faults and press Quote for these: a draft quote is made with the parts and prices, ready to check and send.
Job sheets and your documents
Every completed job has a PDF job sheet: your business details, customer, site, equipment, work carried out, parts, faults found, photos and the signature.
- Press Email the job sheet on the job. The customer’s email is filled in; you can change it. The email is sent in your business name and replies come back to your business email.
- Press Job sheet PDF to see it or print it.
- The Today page tells you how many completed jobs have not had their sheet sent.
Your logo and colours
In Business, under Your documents, add your logo, choose the colour used on job sheets, quotes and invoices, write a footer for every document and the terms printed on quotes, and choose whether job sheets show the photos and the parts.
The Today page and alerts
Today, live shows every engineer on one line with today’s jobs as coloured blocks: booked, on the way, on site, completed and running late (not started 15 minutes after the booked time). The red line is the time now. The page updates itself every minute.
What the figures mean
| Jobs today | Jobs completed out of all jobs booked for today. |
| On time | Of the jobs completed in the last 7 days, the share where the engineer arrived no more than 15 minutes after the booked time. |
| Fixed on the first visit | Of the jobs completed in the last 7 days, the share that were not reopened and did not need another repair or call-out at the same site within 7 days. |
| Average time on site | From “I have arrived” to “Complete”, over the last 7 days. |
Alerts
The bell at the top shows new alerts. Tap one to open what it is about.
- Engineers are told when a job is booked for them, moved or cancelled.
- The office is told when an engineer is on the way, arrives or completes a job.
- Both are told when a booked job has not started 15 minutes after its time.
- Every evening: jobs left open, services due in the next two weeks, documents and vehicle dates about to run out, and reminders about your licence.
Keeping customers informed
In Business, under Customer messages, choose what customers are told and how: when a visit is booked, when it moves, the day before, and when the engineer is on the way.
- Email works straight away, in your business name, and replies come to you.
- Texts go through your own Twilio account, so they come from your number or your name and you pay Twilio directly. Paste the Account SID, the token and the sender; they are checked before saving.
- Customers who do not want messages: tick No messages on their details.
The customer’s own page
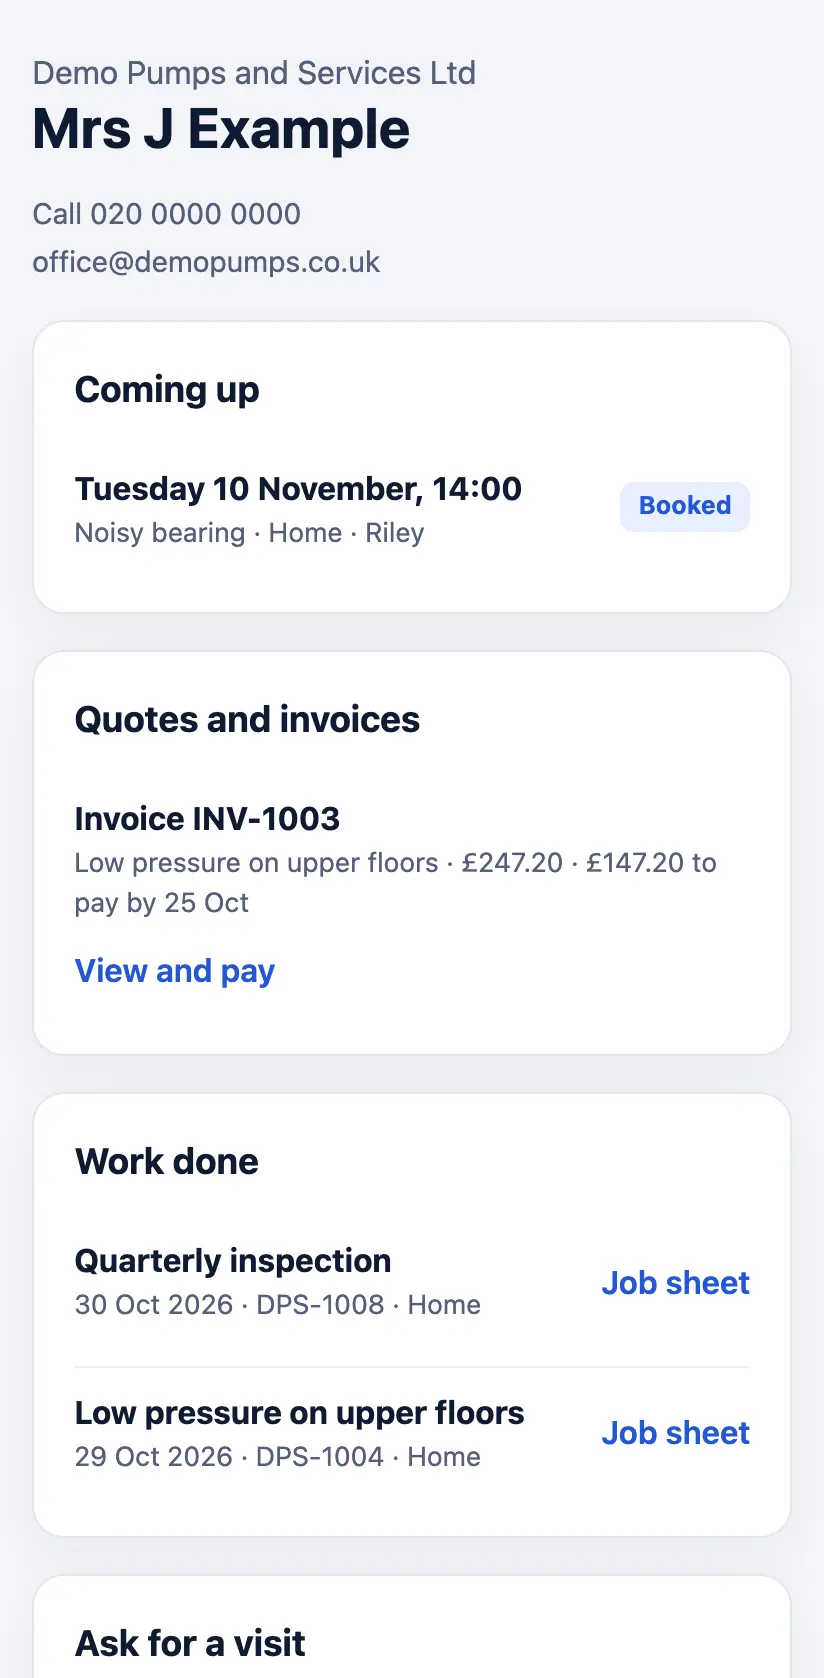
On a customer’s page, under Customer portal, press Make the link and email it. Their private page shows their coming visits, job sheets, certificates, quotes and invoices, and lets them ask for a visit: the request arrives in your Enquiries. New link makes the old one stop working.
Reviews
In Business, under Reviews, paste your Google review link. After each completed job the customer is asked how it went, at a sensible time of day: happy customers are sent to your review page, unhappy ones can tell you privately first. Ask for a review now on a job sends it by hand.
Quotes and invoices
A module: add it to Starter from the Licence page, or take Pro, which includes every module.
- Price book: open Price book and add the parts and labour you sell, with your cost and your price. A spreadsheet of them can be imported.
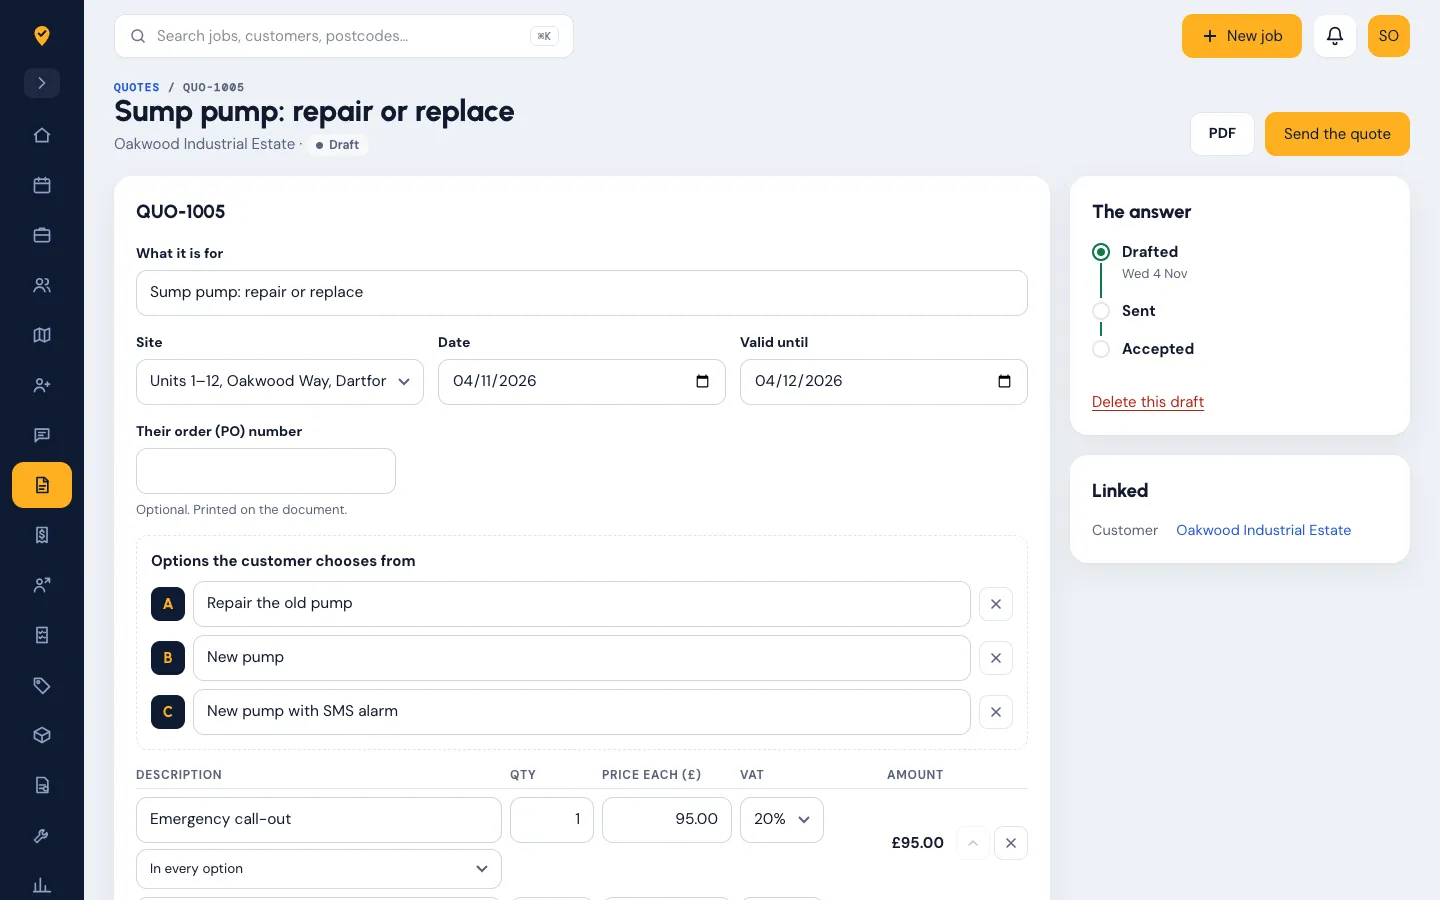
- Quote: open Quotes, add a quote, pick lines from the price book and send it. Give up to three options (like repair, replace, replace with an alarm): the customer picks one and accepts online.
- Invoice: press Invoice this job on a job, or invoice an accepted quote. Add the customer’s order number if they need one.
- Deposits and stages: on an accepted quote, Invoice a deposit or a stage bills a percentage now; Invoice the next stage or Invoice it all bills the rest, with the earlier invoices taken off.
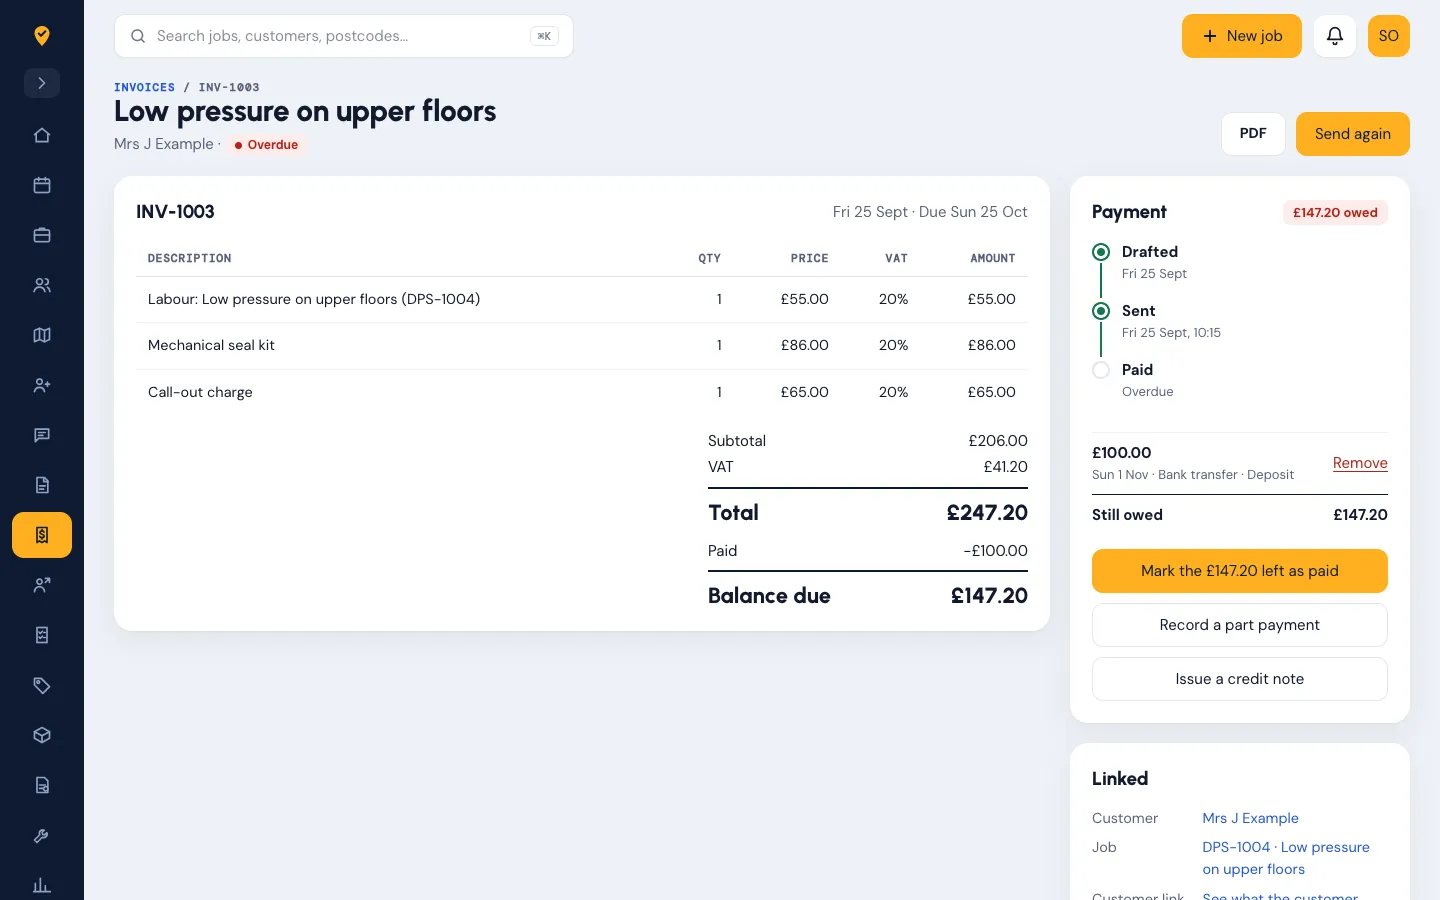
- Payments: on the invoice, Record a part payment or Mark as paid. Overdue invoices are chased by email on their own, as often as you set in Business.
- Credit notes: Issue a credit note on an invoice to take off part or all of it. Credit left over can be refunded or used on the customer’s next invoice.
Getting paid: card and Direct Debit
Both use your own accounts: the money goes straight to you and Field Suite never holds it. Only the owner can switch them on, in Business.
Card payments with Stripe
- In Stripe, open Developers, API keys, Create restricted key. Give it Checkout Sessions: Write only.
- Paste the key under Card payments and press Connect Stripe.
- Every invoice you send now has a Pay by card button. When the customer pays, the invoice is marked paid by itself.
Direct Debit with GoCardless
- In GoCardless, open Developers and create an access token with read-write access. Paste it under Direct Debit and press Connect GoCardless.
- On a customer’s page, under Direct Debit, press Email them the setup link. They enter their bank details once on GoCardless’s secure page, protected by the Direct Debit Guarantee.
- On their invoices press Collect by Direct Debit, or leave Collect by itself when an invoice is sent ticked. The invoice email tells the customer it will be collected.
- The bank takes about three working days. Field Suite checks every half hour and marks the invoice paid once the money is confirmed. If a collection fails, you get an alert and can collect again.
Equipment, servicing and contracts
A module: add it to Starter from the Licence page, or take Pro, which includes every module.
- On a customer’s page, press Add equipment under a site. Add the name (for example “Boiler” or “Booster pump 2”), make, model and serial number.
- Enter how often it needs a service, in months. If you leave the next due date empty, it is worked out from the installation date or from today.
- Open Servicing to see what is due in the next 30, 60 or 90 days, or 12 months. Overdue items are in red.
- Press Create service job: the job goes to the To book list in the diary.
- When a service job is completed, the next due date moves forward by the interval on its own.
Service contracts
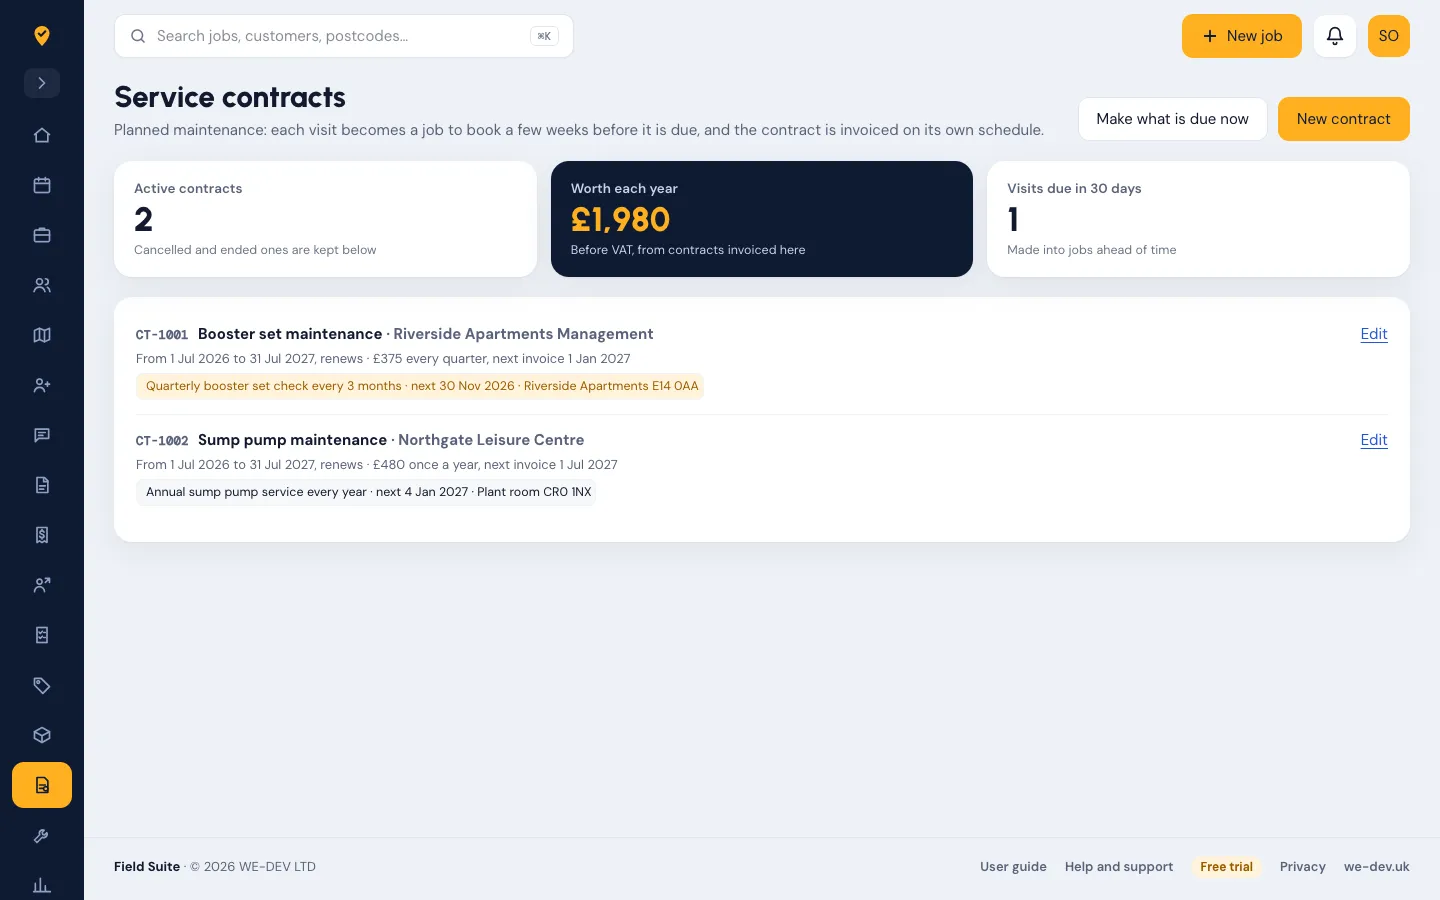
- Open Contracts and press New contract. Choose the customer, the start and end, and whether it renews.
- Add the visits: what is done, at which site and on which equipment, how often (in months), the next due date and the form to fill in.
- Choose how it is invoiced: monthly, quarterly, yearly or not at all, and the price.
- Every morning Field Suite makes the visits due in the next few weeks into jobs to book, tells the customer if you chose that, and drafts the contract invoices for you to check and send. Make what is due now does it straight away.
Stock, vans and purchase orders
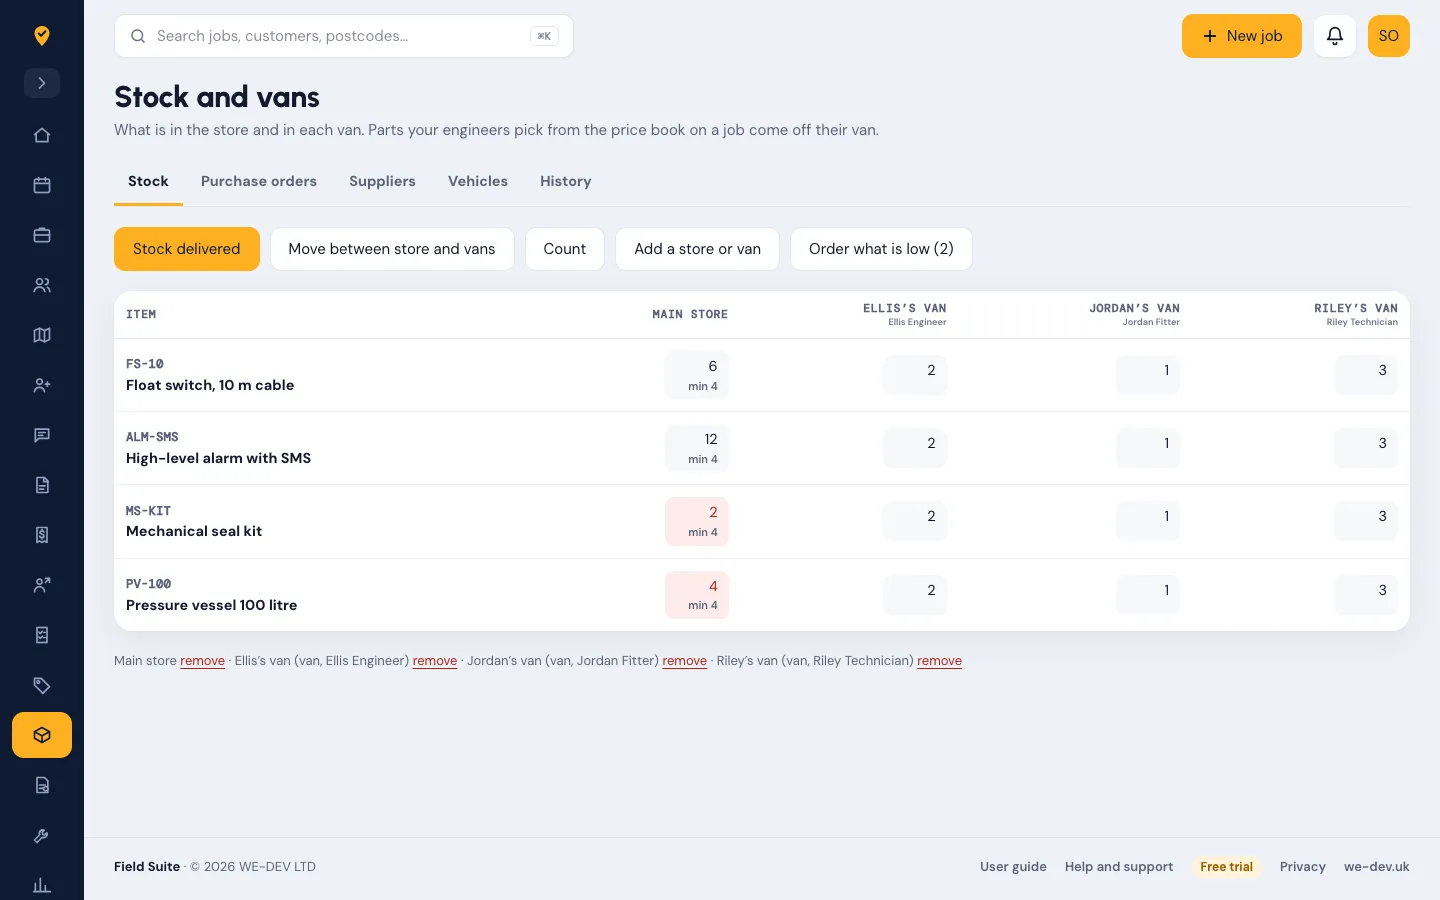
A module (it works with Quotes and invoices): add it to Starter from the Licence page, or take Pro, which includes every module. Open Stock and vans.
- Stores and vans: press Add a store or van and link each van to its engineer.
- What you keep: in the Price book, tick the items you keep in stock and choose their supplier. On Stock and vans, set the minimum for each store or van: below it, the number turns red.
- On jobs: parts the engineer picks from the price book come off their van by themselves.
- Moving and counting: Move between store and vans, Stock delivered and Count keep the numbers right; History shows every move.
- Ordering: Order what is low makes a purchase order for each supplier. Send it as a PDF, and book in what arrives.
- Vehicles: under Vehicles, add each van’s MOT, tax, insurance and service dates. You are warned before each one.
Subcontractors and CIS
- Open Subcontractors and add each firm or person, with their trade, their CIS status (gross, net with 20% deducted, or not verified with 30% deducted) and their HMRC verification number.
- Keep their insurance and other documents with expiry dates: you are warned before they run out.
- On a job, under Subcontractor, give the work to one of them with the agreed price. They get an email with a private link: they accept or turn down the job, and when it is done they say what they did, add photos and their invoice number. You are told at each step.
- When you pay them, Record the payment with the labour and materials: the CIS deduction is worked out on the labour only. Download a monthly CIS statement for each subcontractor (tax months run from the 6th to the 5th).
Job costs and margin
On each job, Costs and profit sets what the job cost against what you charged: labour from the travel and time on site at each engineer’s hourly cost, parts at cost, the subcontractor’s price and the expenses claimed on the job. Set each person’s hourly cost on the Team page. The office sees it; engineers do not.
People: time off, hours and expenses
A module for everyone in the team. Each person opens My time:
- Ask for time off: holiday, sick, training or other, whole or half days. Weekends and the bank holidays of the person’s part of the UK (England and Wales, Scotland or Northern Ireland) are not counted.
- Claim an expense with a photo of the receipt, and Claim mileage, worked out at the HMRC rates (which you can change).
- My qualifications, with expiry dates: you are warned before they run out.
Owners and admins open People to decide time off, approve claims and see everyone’s hours, holiday left and qualifications. New people start on 20 days with bank holidays on top; if your business counts bank holidays inside the allowance (the legal minimum of 28 days can include them), tick Bank holidays come out of the holiday allowance.
More than one branch
In Business, under Branches, add each branch with its own address, phone, email and bank details for its documents. Choose whether each branch has its own job, quote and invoice numbers.
- On the Team page, put each person in a branch, and tick Sees only this branch for people who should see nothing else.
- Owners and admins choose at the top of the menu which branch to look at, or all of them.
- Jobs, quotes and invoices carry the letterhead of their branch.
Reports and exports
A module: add it to Starter from the Licence page, or take Pro, which includes every module. Open Reports and choose the dates.
- Jobs completed, created and cancelled; arrivals on time; job sheets sent.
- For each engineer: jobs completed, average time on site and share of jobs signed by the customer.
- Jobs by type.
- Download spreadsheet (CSV) gives every job in the period with times, parts and work done. It opens in Excel, Numbers or Google Sheets.
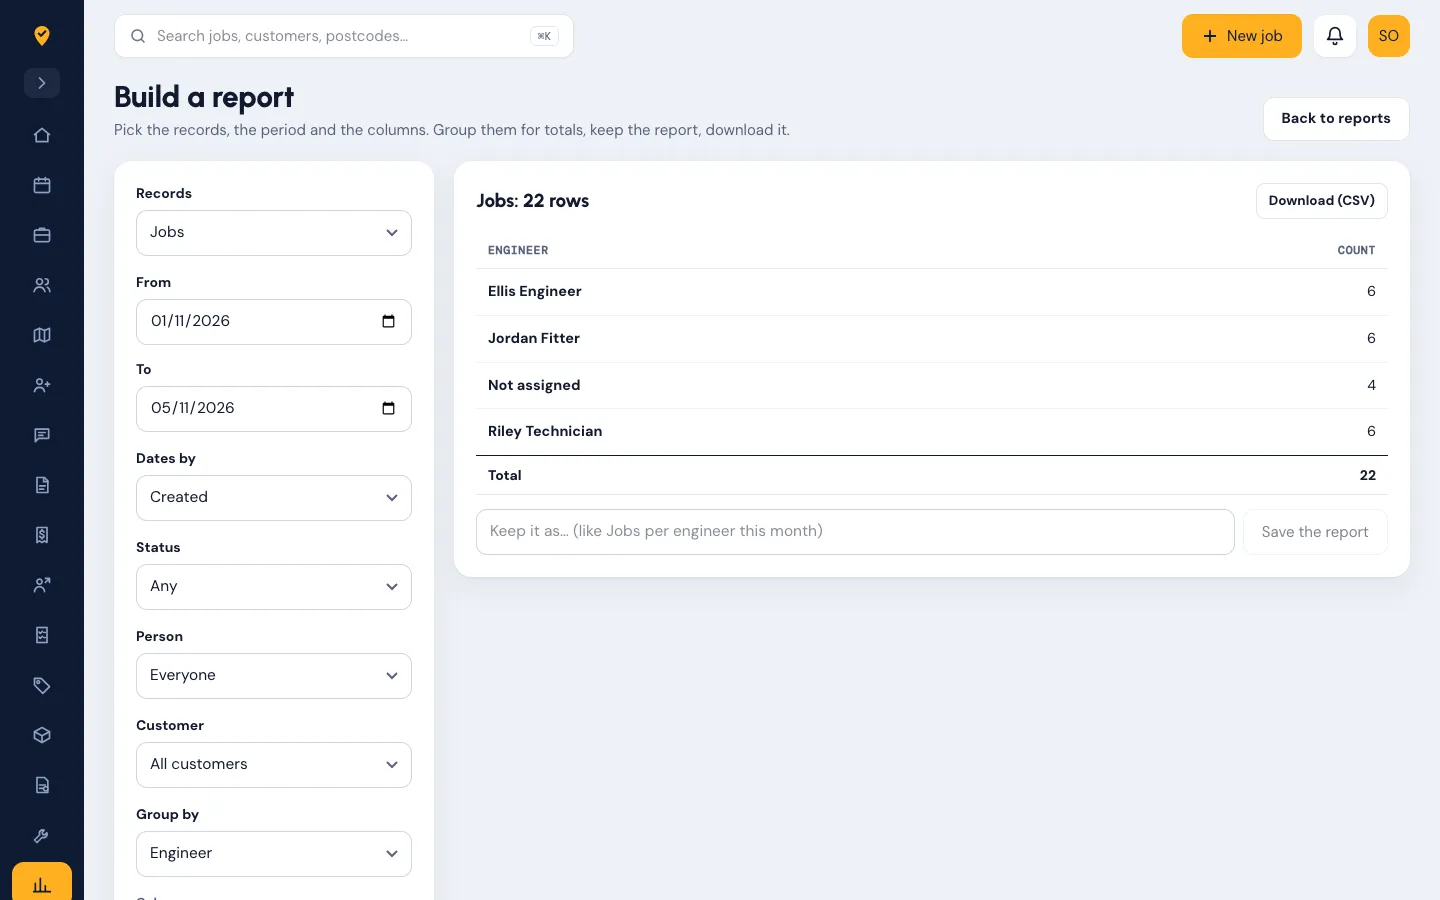
Build your own report
On Reports, open the report builder. Choose the records (jobs, quotes, invoices, payments, hours or expenses), the period, the columns and, if you like, group them by engineer, customer, status or month for totals. Press Show the report, give it a name and Save the report to open it again later, or Download (CSV).
Accounts, calendars and other software
Open Integrations (owners and admins).
- Xero or QuickBooks Online (the Accounting sync module; Sage coming soon): press Connect, sign in to your accounts program and say yes. Choose the sales account, the VAT rates and the bank account. Invoices, credit notes, payments and new customers are sent as they happen; payments you match there are marked paid here. Field Suite never sees your password, and you can disconnect at any time.
- Export for your accountant: without connecting anything, download invoices and credit notes as a spreadsheet ready to import into Xero, QuickBooks Online or Sage 50.
- Your calendar: Make my calendar link and add it to Google Calendar, Outlook or Apple Calendar to see your jobs there. Anyone with the link can see the jobs, so keep it private.
- API keys and webhooks: for your own software or a developer. Webhooks tell another system the moment a job is created or signed off, an enquiry arrives, a quote is accepted, or an invoice is sent or paid; each one is signed so it can be checked.
Moving from another system
- Open Import. Save each list from your old system as a CSV file: customers and sites, equipment, jobs, the price book, open invoices, or maintenance contracts (one row per planned visit; rows with the same customer and contract name become one contract, and nothing is invoiced from it until you set the next invoice date).
- Upload it and press Next: check the columns: match each column to a field in Field Suite. You see the first rows before anything is saved.
- Job photos: put the job reference in each photo’s name or folder, upload them as a ZIP file (up to 100 MB each), then Add the photos.
- Every import is listed under Imports so far. Rather we did it? With a support plan, ask us on the Support page.
Your licence and payments
Only the owner and admins see the Licence page; only the owner can pay.
- Choose Starter or Pro, monthly or annual: Starter covers the diary, jobs, the engineer’s phone, certificates and job sheets, and you add only the modules you need; Pro includes every module and priority support. Annual plans cost ten months. See Pricing.
- Choose how many office users and engineer users. Office users (owner, admins, office staff) have a full licence; engineers who work from the phone have a cheaper one. An office licence can also be used by an engineer, not the other way round.
- Tick the modules you want. Each is charged only for the people who use it: Quotes and invoices, Assets, servicing and contracts, Reports and Stock for office users, People for everyone. The monthly total is shown before you pay, plus VAT.
- Pay by card with Pay by card with Stripe. You are taken to Stripe’s secure page and back. The licence updates within a minute.
- Prefer an invoice? Ask us on the Support page. After the bank transfer we send a licence code: enter it under Have a licence code?.
- To add or remove users or modules on a card plan, the owner changes the numbers on the Licence page and presses Update my licence: the change is immediate and the difference goes on the next payment.
- To change the card, see invoices or cancel, the owner presses Card, invoices or cancel.
- If a card payment fails, Stripe tries again and you keep working for 7 days. The owner and admins are told in the app and by email, and again two days before the account would become read-only.
- When a trial or licence ends, the account becomes read-only: everything stays visible, nothing new can be saved. Renew and you carry on where you left off. Nothing is deleted.
Getting help
Open Support from the menu. Choose what it is about, say how urgent it is and describe what happened. We reply in the app and by email:
- Standard support: by the end of the next working day.
- Priority support (in Pro, or as an extra on Starter): within 2 working hours.
Working hours are Monday to Friday, 9:00 to 17:30 UK time. You can also call 020 3918 3814 or email support@fieldsuiteapp.com.
Keeping your account safe
- Two-step sign-in: open your initials at the top right, then Two-step sign-in. Scan the code with an authenticator app (Google Authenticator, Microsoft Authenticator) and save the recovery codes somewhere safe.
- Owners and admins can make two-step sign-in compulsory for everyone in Business.
- Passwords need at least 12 characters with letters and numbers, and cannot be one known from a data breach.
- Each business’s records are kept apart: nobody outside your business can see your customers or jobs.